
Anyone who is reasonably handy might assume that replacing the lock cylinder in their front door is something they can do themselves – perhaps because new keys are needed or for security reasons after a key has been lost. And if it looks as simple as in the following video, wanting to save the cost of calling a locksmith seems only natural.
Remove the screw, replace the lock cylinder and put the screw back in – unfortunately, it is not that simple with Biffar security locks. Removing the cylinder is still easy. But then it refuses to go back in: something suddenly blocks the cylinder from being reinserted. In my case it was a small brass plate that could not simply be pushed aside (see photo above). While searching online I found this carpentry forum. It reports that a special tool is required to install cylinders in Biffar security locks. Apparently this tool is called a “Zabadäus”, and supposedly only locksmiths authorised by Biffar have one.
However, forum user Michael SB writes:
You only need the Zapadäus if the door is closed and the cylinder is removed while the door is locked.
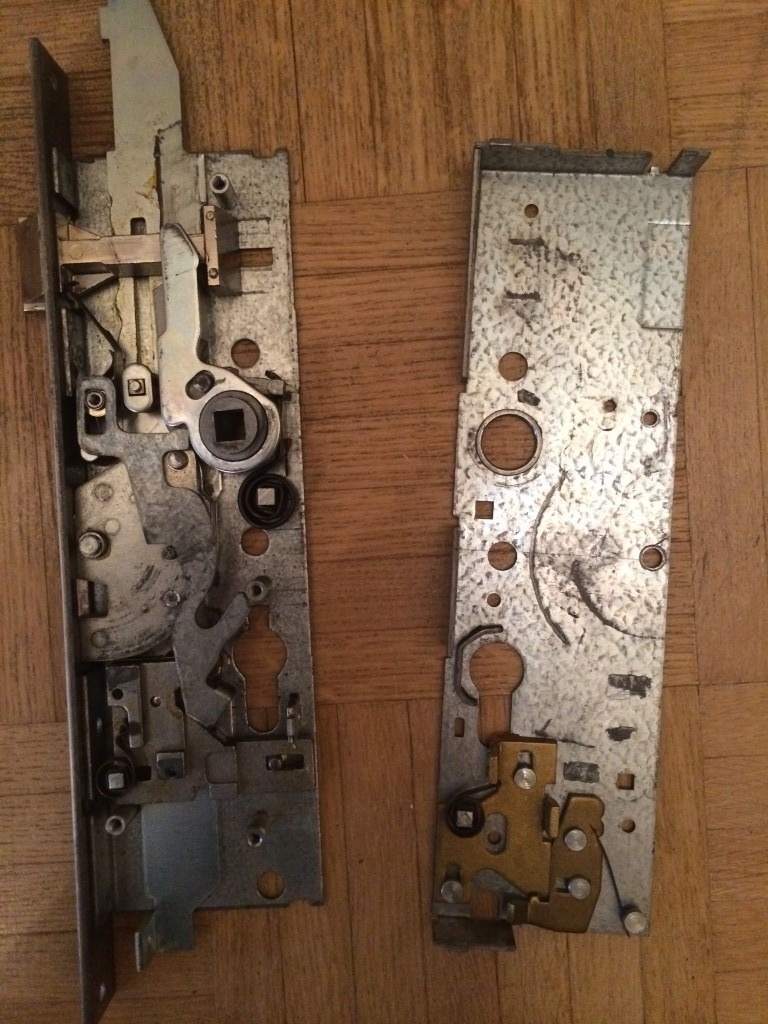
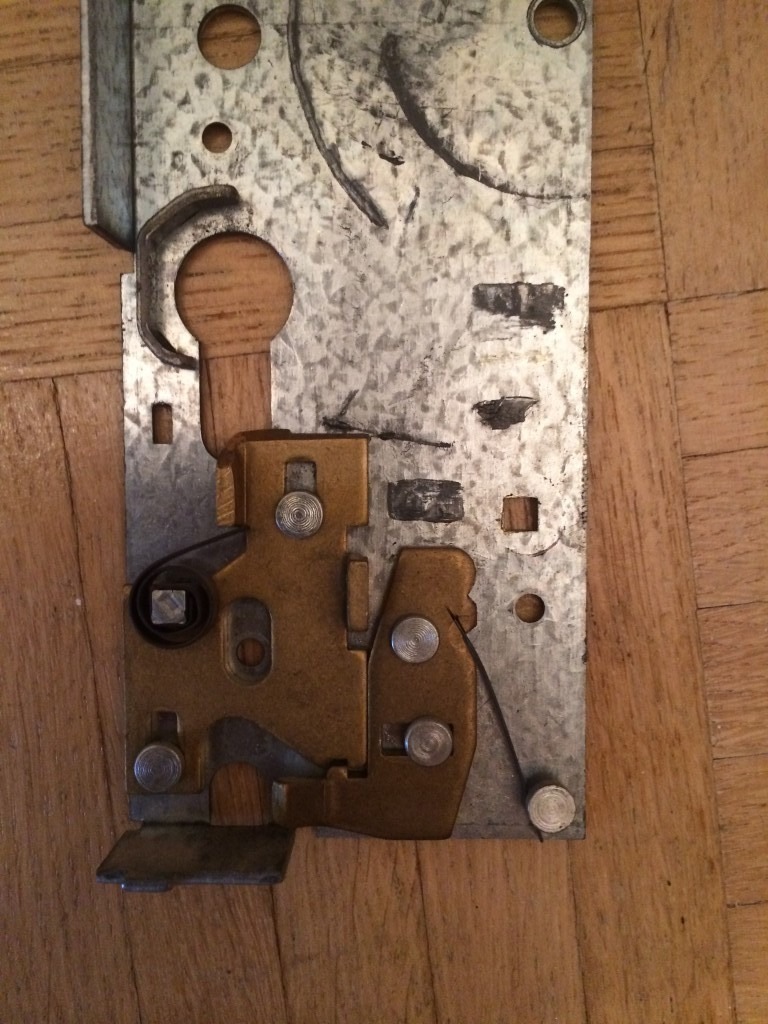
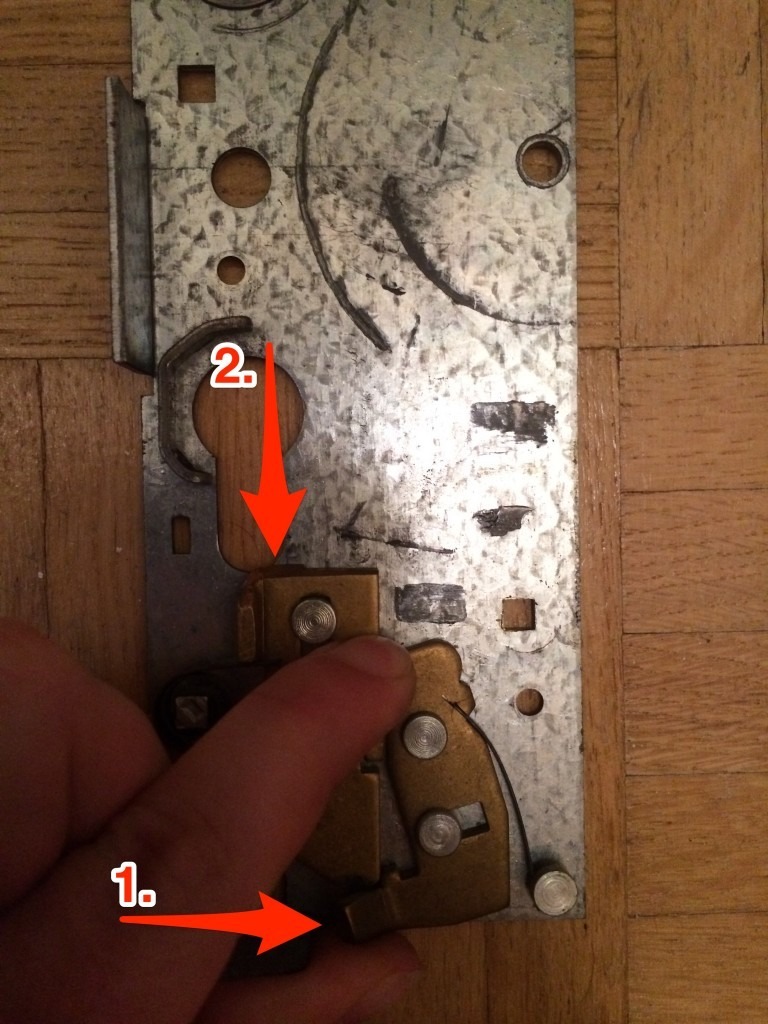
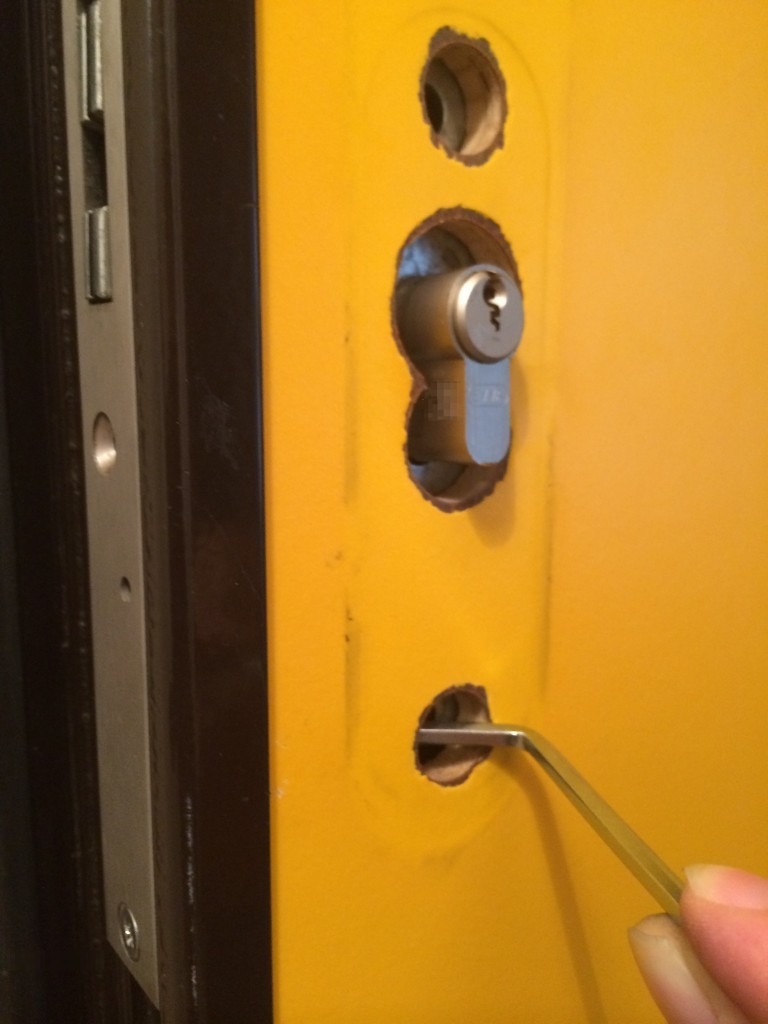
To find out how it works without the special tool, I removed and dismantled the entire mortise lock; see image 1 below. Image 2 shows the mechanism that prevents the lock cylinder from being inserted. The third image shows how to release the lockout mechanism with the housing open. Finally, image 4 shows the trick for reinserting a lock cylinder without Biffar’s special tool. You can use a bent Allen key, for example, to operate the bolt inside the installed mortise lock. While doing so, reinsert the lock cylinder. As it is pushed through, the cylinder can now move the brass plate down and out of the way. And just like that, you have saved yourself the locksmith call-out with the special tool.
UPDATE 27 April 2014
Reader Mario emailed me with the following information:
If the door can be opened and you have a clear view of the latch – which is normally the case because you have just removed the screw holding the lock cylinder – you release the safety mechanism by inserting a pointed tool (awl, nail) into the small hole below the latch. The locking pin becomes movable and can then be pushed down by the lock cylinder itself.
The hole is even visible in your image #4.
Best regards, and thanks for the helpful pictures
Thanks for your feedback, Mario!






Zebedäus ist hebräisch und heißt “Geschenk Gottes”.. solche seltenen Helfer werden oft als Zebedäus bezeichnet..
Eigentlich ist es kein Geschenk Gottes, wenn man zum Schloss wechseln gleich eine speziellen Schlosser beauftragen muss…
Toller Post, super Blog. Herzlichen Dank, da wäre ich ja schön aufgelaufen ohne diese Info
Danke Dir!
Freue mich wenn ich helfen konnte.
VG!
Hatte ich letztens auch das Problem, aber wie Mario schon geantwortet hat, ein kleiner Schraubendreher ist meist ausreichend. Da dieses Biffa-Schloss keine doppelte Schließnocke benötigt, wäre ein Ausbau auch mit angeschraubtem Beschlag möglich gewesen. Gruß Vikke.
Danke für den Tipp. Bei mir tat es auch ein Rouladen-Spiess, mit dem ich bei offener Tür die Verriegelung lösen konnte 😉
Beitrag zum Entriegeln der Schlossfalle war super
Nach 90 Minuten probieren konnte ich den Schliesszylinder wieder einbauen
Danke
Besten Dank! Diese Info hat mir gerade echt den A….. gerettet!????
Wow – ihr habt mir gerade den 1. Advent gerettet.
Ich dachte Zeit genug mal schnell den Zylinder zu messen um was sichereres zu kaufen –
und siehe da er gingt nicht mehr rein. Die Tür hatte ich zum Glück auf.
Anhand der Bilder konnte ich den Mechanismus gut erkennen und den Zylinder wieder einbauen.
Meiner ist leider ein Doppelschliesser mit 2 Schliessnocken, da passt dann wohl nicht jeder Zylinder …
Danke! Danke! Danke!
Hatte schon die totale Krise bekommen.
Freue mich, dass ich helfen konnten. Schönen Sonntagabend noch.
VG
Michael
Es ist selten, dass etwas so nützliches wie diese Bilder im Netz steht. Vielen Dank dafür. Meine 12 Jahre alte Biffar Tür musste einen neuen Zylinder bekommen und als erstes musste ich den alten ausmessen. Dank Deinen Bilder wusste ich was ich tue. Noch mal vielen Dank.
Danke für diesen Tipp!! Bin fast verzweifelt!
Danke, es war wirklich sehr hilfreich, ohne euch hätte ich Wohl den Schlüsseldienst geholt.
Vielen Dank, war absolut richtig, habe aber mit Stricknadel durch das kleine Loch unter der Falle die Verriegelung noch einfacher gelöst. Aber ohne euren Hinweis wären wir gescheitert!!!
Absolut super Anleitung. Habe einen Nagel mit ca. 3mm Durchmesser und 100mm Länge vorne stumpf gemacht und 5mm abgebogen. Der wichtigste Himweis ist, dass der Riegel nicht in Richtung Türblatt, sondern in Richtung Zarge zu finden ist.